Thursday 23 February 2012

Baby shower cupcakes


I thought I would share a lovely idea my friend Ash had the other day. She was putting together a book-themed baby shower and asked me to make these cupcakes.


I used The Hummingbird Bakery Cookbook's vanilla cupcake and vanilla icing recipes. I won't copy out the recipes for them here because that's not the point of this post. As we don't know whether the baby's a boy or a girl, I divided the icing and put a splash of pink in one half and a splash of blue in the other. I'm quite proud of myself for managing these pale colours because I usually accidentally end up with extremely vibrant-looking food when I get hold of food colouring. Then I got carried away and sprinkled cachous over the tops (because, wheeeeeeeeee, they're so pretty)!

Next, I found a dozen popular kids' book covers on Google and printed two of each in tiny, cupcakey proportions. I laminated them (food-proof!) and used Blu-Tack to stick them back-to-back on toothpicks. It turned out to be a pretty easy and inexpensive way to make DIY cupcake decorations, and it could possibly work with some other baby shower themes as well.


Incidentally, see that weird tray the cupcakes are sitting in? It's part of a super-cool cake/cupcake carrier I bought online that makes transporting your baking a cinch. I love it!

Sunday 6 November 2011

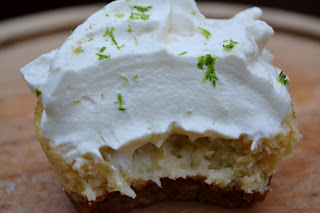
Mini key lime pies


It’s surprising how many Australians don’t know what key lime pie is (“Did you say 'keen line pie'?”) – surely it won’t be long before this delectable treat is considered a popular favourite right across the globe. For the time being, however, it’s a quintessentially American dessert. One that, in my mind, evokes images of Gran Stackhouse baking in her Bon Temps kitchen on a sticky, swampy Louisiana summer’s evening… even though her pie of choice was actually the pecan pie. But I digress. 


So what is key lime pie, exactly? Well, if you like lemon meringue pie, you’ll love key lime pie. The base is made up of crushed biscuits (as with a cheesecake base) and the centre is sweetened condensed milk and egg yolk, mixed up with a good dose of lime – the tartness of which is offset by the fresh, whipped cream topping. While the meringue topping of a lemon meringue pie can turn that dessert into an overly-sweet mess, the fresh cream topping of a key lime pie allows the flavour of the filling to really shine.
Baked and then chilled in the fridge before serving, this is a make-ahead dessert that will never fail to impress. It’s also dead easy.
This week, I adapted my key lime pie recipe to a miniature size so it was easier to share around at work. It would also make travelling a lot easier if you don’t have a proper cake carrier.


Ingredients

Base
180 g digestive biscuits
60 g unsalted butter, melted and slightly cooled

Filling
6 egg yolks
600 g sweetened condensed milk
4 limes

Topping
300 ml thickened cream
Zest of 1 lime


Method

  1. Preheat oven to 160ºC. Grease a 12-hole cupcake tray and line base of each hole with a circle of baking paper. Cut strips of baking paper and place two in every hole, forming a cross on the base, and rising up sides to above the height of the tray (see pictures below). These will act as pull-tabs to help you remove pies after baking and chilling.
  2. For the base, break biscuits into smallish pieces and process in a food processor or similar until finely ground. Pour the butter over the biscuits and mix again until butter is mixed through.
  3. Using finger-tips, firmly press about 2 tablespoonfuls of mixture into each cup to form a dense base approximately 0.5 cm thick. Bake for 12 minutes, then leave to cool completely in tray.
  4. Preheat oven to 140ºC. Zest the 4 limes, then cut each lime in half and juice well.
  5. In an electric mixer with a whisk attachment, gently whisk together egg yolks, sweetened condensed milk and lime juice and zest until mixture thickens slightly (about 1–2 minutes). Pour mixture into holes, not quite to the brim. Bake for approximately 13–15 minutes or until pies are slightly golden around edges. Set aside to cool completely before refrigerating for a few hours at least. Use pull-tabs to remove from tray.
  6. Before serving, whip the thickened cream and dollop over the tops of the pie. Decorate each with a very small amount of lime zest.
Makes 12.


Tips

  • How small is ‘smallish’? I break each biscuit into four or five pieces about the size of a 20c piece.
  • I use my smoothie maker instead of an actual food processor, and process the biscuits in two smaller batches because my smoothie maker can’t handle the whole lot at once. I empty the first batch into a mixing bowl. Before emptying out the last batch from the smoothie maker, I add the melted butter to it and give it a good whiz. When I add it to the first batch in the mixing bowl, I mix it well with a wooden spoon to ensure the butter is distributed through the entire mixture.
  • If you don’t own a food processor or smoothie maker, you can still crush biscuits for pie (or cheesecake) bases by placing them in a plastic bag, tying it shut, and bashing the biscuits to bits with a rolling pin.
  • You’ll notice in my photos that I didn’t use the baking-paper pull tabs for each pie. I was testing different methods when I took the photos, and the pull tabs worked best. If you don't use pull-tabs, you’ll have to push a knife down the side of the pie to loosen it (and end up with a knife-shaped mark on the side of each pie).
  • Even though the pies are easy to make, there is a lot of “cooling time” involved. So that making these pies doesn’t take up your whole evening, you can do this recipe ahead up to Step 3, leave the finished bases in the fridge overnight, then continue with the rest of the recipe the next day.
  • If you don’t like the sound of the whipped cream topping, you can use meringue. But, as someone who doesn’t even like whipped cream, I have to say it is delicious with these pies and it would be a shame if you didn’t give it a chance!

Sunday 31 July 2011

Apple pie


What better way to warm the cockles of the heart in deepest, darkest winter than with a slice (or two) of homemade pie? Lately my pie of choice has been the humble apple pie.

Perfectionist that I am, I’ve put a lot of effort into working out how to end up with apple filling that, while not looking like complete goo, has no “crunch” left in it. I mean, if Sara Lee can do it, why can’t I?
I Googled high and low for an answer, but every forum I found was discussing the opposite of my question – offering suggestions on how to keep a pie from being too gooey and too mushy. So I set out to do the footwork by myself.

After trying golden delicious, red delicious, royal gala, granny smith, fuji; not pre-cooked, slightly pre-cooked, completely stewed; roughly chopped, diced, thinly sliced; and various combinations of all of the above, my mind is made up. I’m hope you’re not too disappointed with what I discovered: my best result came from using tinned pie filling. For serious. It’s the holy grail of apple pie. Here’s a photo of some.


If you’re turning up your nose at the very notion of using tinned apples, see my “Tips” section at the bottom of this post for an alternative. But because I don’t like any “crunch” at all in my pies, I’m sticking to the tinned stuff.


Ingredients
250 g unsalted butter, chopped
600 g plain flour
1 tsp salt
(Up to) 6 Tbs cold tap-water
3 x 400 g tins sliced apple pie fruit
250 g caster sugar
2 tsp ground cinnamon
1 egg
1 Tbs milk
Extra caster sugar for sprinkling

Method
  1. Grease a 23 cm pie tin or tart tin.
  2. In an electric mixer set on low speed, mix together flour, butter and salt until a sandy consistency. Without stopping the mixing, add 2 Tbs tap water and allow to mix in completely, then repeat with another 2 Tbs tap water. The mixture should start coming together a little bit; add up to another 2 Tbs tap water (so that’s 6 Tbs in total) until the dough comes together in a few large lumps. Be careful not to add more water than you need.
  3. Turn off the mixer and push the dough together into a ball with your hands. Wrap the ball of dough in cling film and leave to rest for 1½ hours.
  4. Preheat oven to 170ºC. Empty the cans of tinned apple into a large bowl and stir in caster sugar and ground cinnamon.
  5. Place a bit more than half the dough on a lightly-floured bench or board, and roll out into a rough circle shape about 3 mm-thick with a rolling pin. Using the rolling pin underneath the dough to support it evenly, carefully lift the dough into the prepared pie tin. Shape the dough into the tin, lightly pressing it into corners and over the edges.
  6. Pour in the apple mixture.
  7. Whisk the egg and milk together in a cup with a fork. Using a basting brush, baste the overhanging rim of the pie with egg and milk mixture (this will help “glue” the lid on later). Retain the egg and milk mixture for use in Step 8.
  8. With the remaining dough, repeat Step 5 to create the pie lid and carefully lift it on top of the pie. Cut around the outside of the pie with a sharp knife to remove excess pastry. Shape the excess pastry into shapes such as leaves, and press patterns into them with the blunt edge of the knife. Firmly press the tines of a fork all the way around the edge of the pie seal the “lid” shut and to decorate. Thoroughly baste the entire top of the pie with the egg and milk. Add the leaf decorations to the top of the pie, then baste them also.
  9. Sprinkle extra caster sugar over the top of the pie. Use the sharp knife to make at least 3 small slits in the pastry through which air can escape through during cooking.
  10. Bake in preheated oven for  35–40 minutes. Serve hot or cold with cream or ice cream.
Serves 8

sandy consistency


Tips
  • If you really don’t want to use tinned apples, instead create your own filling from 1.3 kg of peeled, chopped apples. Stew them in a large saucepan over low heat in a small amount of water until the apples reach your desired consistency. Drain if necessary. Cool apples, then stir in caster sugar and cinnamon.
  • The best “real apple” to use in apple pies is supposedly the granny smith, but I think the golden delicious and sun downer taste even better. And you don’t have to stick with one type of apple – mix together two or three of your favourites.
  • If you realise you haven’t rolled your pastry thinly enough and it’s not going to be big enough, don’t try to “make do”! Put it back on the bench and keep rolling until it is big enough. A bit of extra handling isn’t going to kill it.

Remove excess pastry with a sharp knife

Press the tines of a fork into pasty edge to decorate

Thursday 21 July 2011

Turkish delight


 I have always said that if I had to choose one chocolate bar to live on for the rest of my life (do you torture yourself with these hypothetical food questions too?), I would pick Fry’s Turkish Delight. The reason would not be that, as the wrapper claims, it has “60% less fat*”,  but simply that it tastes fresh, isn’t too rich, and has a unique flavour. So this week I set about trying to recreate the taste at home.

While I really don’t think I managed to replicate the exact flavour and jelly-like consistency of a bar of Fry’s Turkish Delight, I have accomplished microwaveable Turkish delight (loosely based on a Super Food Ideas recipe) very similar to the boxed kind that you buy at the supermarket covered in icing sugar, and added some chocolate (a fetish I alluded to in my last post).

You might be interested to learn that the original name for Turkish delight is lokum. It was introduced to Britain after a British traveller tasted some in Istanbul – and was obviously as delighted by it (see what I did there?) as you will be if you try out my recipe.


Ingredients
750 ml hot tap-water
35 g powdered gelatine
500 g caster sugar
120 g cornflour
150 g soft icing sugar mixture
¼ tsp cream of tartar
2 tsp rosewater
4 drops red food colouring
200 g good quality chocolate, roughly chopped
Extra soft icing sugar mixture (if desired)

Method 
  1. Grease and line a 27 x 18 cm slice pan and line bottom and sides with baking paper.
  2. Pour the tap-water into a large, microwave-safe bowl (I used my big Pyrex bowl) and sprinkle half the gelatine quantity over the top, whisking in thoroughly with a fork. Repeat with the remaining half of the gelatine. The gelatine should break up and mostly dissolve. Stir in caster sugar.
  3. Microwave for 5 minutes, stir with fork, then microwave again for 3 minutes.
  4. Whisk in cornflour, icing sugar mixture and cream of tartar. Microwave for another 3 minutes.
  5. Whisk in rosewater and red food colouring, allow mixture to cool for five minutes, then pour into prepared pan. Scrape any bubbles from the surface with a fork. Cool to room temperature, then refrigerate overnight.
  6. Melt the chocolate in a heatproof bowl over a saucepan of simmering water, ensuring bowl never touches the water. Stir occasionally until melted and smooth. Spread chocolate over top of the Turkish delight with a spatula.
  7. Refrigerate about 20 minutes before turning out of the pan onto a chopping board and cutting into squares (or funky shapes) with a big cook’s knife.
  8. Straight before serving, roll squares in a small bowlful of icing sugar, if desired.


Tips
  • Cooking times are based on my 1100 watt microwave.
  • Leave plenty of baking paper overhanging to make it easy later to remove the Turkish delight from the pan and peel off the baking paper.
  • From Step 5 onwards, I found it easier to use a proper whisk instead of the fork.
  • At Step 5, it’s important to allow that 5 minutes of cooling time so that the baking paper doesn’t warp and buckle into the middle of your mixture. Try it and you’ll see what I mean!
  • When melting chocolate in a bowl over simmering water, be careful not to burn yourself on steam escaping from between the bowl and the saucepan – especially when you're stirring the chocolate. You can actually buy double-boilers to use for this exact kind of thing, but I haven't bothered yet.
  • Heating your knife will make it easier to cut the Turkish delight. Heat your knife by holding it under a (very) hot tap for a whole minute and drying it off quickly before cutting. If you have trouble with the chocolate shattering, try turning the Turkish delight upside-down to cut.


“*than the average of leading chocolate bars”

Friday 15 July 2011

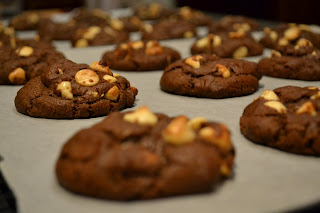
Reverse chocolate chip cookies


So I’ve just realised that I have a serious chocolate problem. One symptom: I believe I can “improve” every recipe by adding chocolate to it – well, every sweet recipe, anyway. And I’ve done it again!
These decadent little treats are a chocolate lover’s dream – a good dose of melted chocolate gleefully blended into a chewy cookie mixture, and plenty of white chocolate chips thrown in to give your teeth something exciting to hook into (and also provide a nicer visual than brown-on-brown).

My main piece of advice with chocolate chip cookies is to very carefully monitor the cooking time. Everyone’s oven works a little differently, so perhaps even do a few test runs of one or two cookies to find out what the ideal cooking time is in your oven. And it’s much better to take them out too early than leave them in too long. Who wants crunchy chocolate chips cookies? 

When you take them out of the oven, the cookies will be tall and puffy, and you might think they’re undercooked, but rest assured that they will collapse back into a normal cookie shape as they cool. Leave them to rest on the oven trays for a while, otherwise they will be far too floppy to transfer onto the wire racks.

Interesting fact: chocolate chip cookies were invented by a happy mistake! A cook named Ruth Wakefield was making cookies and, after running out of her usual ingredient (the exact ingredient varies depending on which version of this story you read), decided to use chopped up chocolate instead, thinking it would melt into the cookies as they cooked. Luckily, she was wrong, and so began the life of chocolate-chip cookies, which were initially named “toll house cookies” (after the name of Wakefield’s inn). It’s hard to believe this only happened about eighty years ago – can you imagine life without chocolate chip cookies?


Ingredients
120 g Nuttelex (see tips below for alternatives)
½ tsp vanilla extract
85 g brown sugar
85 g white sugar
½ large egg
190 g plain flour
½ tsp bicarbonate of soda
1 tsp cocoa powder
50 g dark chocolate Melts, roughly chopped
160 g white chocolate chips

Method
  1. Preheat oven to 170°C and line baking trays with baking paper.
  2. Melt the dark chocolate pieces in a heatproof bowl over a saucepan of simmering water, ensuring the bowl never touches the water. Stir occasionally until chocolate is melted and smooth.
  3. Allow chocolate to cool while beating together Nuttelex, vanilla, sugars and egg with an electric mixer until light in colour and texture (see image below).
  4. Scoop a cupful of the mixture into the melted dark chocolate and mix together with a spoon to bring down the temperature of the chocolate, before adding it to the rest of the mixture and mixing thoroughly until the colour is even.
  5. Sift together the flour, bicarbonate of soda and cocoa powder into a large bowl. Add half at a time to the mixture, mixing well after each.
  6. Add white chocolate chips and mix lightly and briefly with the elective mixer or by hand.
  7. Refrigerate 1 hour.
  8. Roll mixture into 3 cm balls and place on the prepared baking trays approximately 3 cm apart from each other.
  9. Bake cookies for 10 minutes. Cool on trays for about15 minutes or until cookies can be lifted across to wire racks without bending too much. Cool completely on wire racks.
Makes 25–30.

Step 3 – beat the mixture until it becomes light

Step 4 – add some of the mixture to the melted chocolate


Tips
  • Nuttelex is a dairy-free table spread, which we used in my house while I was growing up. It’s an alternative to butter and margarine, and you can find it beside them in Australian supermarkets. I’ve also tried this recipe with unsalted butter and Meadow Lea (margarine), and they all work fine, but I love the Nuttelex ones best. Just use whatever you have in the fridge.
  • If you don’t have white chocolate chips, it’s perfectly okay to simply chop up a white chocolate block, but make sure the pieces are the size of chocolate chips – because huge lumps of white chocolate don’t taste as nice in a cookie as huge chunks of real chocolate do.
  • If you’re wondering why the ingredients list specifies half an egg, it’s because this recipe in its original form makes about 60 cookies from one egg. I crack one egg into a glass and whisk it well with a fork to combine the yolk and the white, then pour half of it into the mixture (very slowly and carefully or the entire egg will plop in all at once). I haven’t tried using an entire egg, but chances are it would work okay.
  • When melting chocolate in a bowl over simmering water, be careful not to burn yourself on steam escaping from between the bowl and the saucepan - especially when you're stirring the chocolate. You can actually buy double-boilers to use for this exact kind of thing, but I haven't bothered yet.
  • The mixture will be fine if left in the refrigerator for longer than an hour, but will become firmer the longer it’s in there.
  • This recipe makes enough cookies to require three baking trays. Because I only have two, I put the cookie mixture back in the fridge while the first two trayfuls are cooking and cooling.


Thursday 30 June 2011

Chocolate brownies (cakey)


As many people like their brownies fudgy as those who prefer them cakey – when I put the question out to my Facebook friends, the responses were evenly split. A few weeks ago, I posted my recipe for lovely, dense and fudgy brownies. Since then, I’ve gone through kilograms of chocolate and butter, trying to perfect lighter, “cakier” brownies… and I’ve finally done it!

The secret seems to be cutting back drastically on the quantity of butter and sugar. I’ve added some sour cream because I saw it used in a brownie recipe in the Bourke Street Bakery cookbook and it seemed like a good idea.

I’ve also started using a metal tin when I make brownies (instead of my old ceramic slice pan) because I’ve read that it gives brownies a better “crumb”.

Of my two versions of brownies, this one has to be my personal favourite.


Ingredients
200 g dark chocolate (buttons, or roughly chopped)
50 g unsalted butter, chopped
2 eggs
200 g caster sugar
100 g plain flour
1½ tsp baking powder
Pinch salt
65 g sour cream

Method
  1. Preheat the oven to 170°C. Grease a 26 x 16 cm slice tin and line with baking paper.
  2. Melt the chocolate and butter together in a heatproof bowl over a saucepan of simmering water, ensuring the bowl never touches the water. Stir occasionally until butter completely melted. Mixture will stiffen. Remove from heat and allow to cool.
  3. Beat eggs and sugar together with an electric mixer until they are well combined and light in colour.
  4. Add the cooled chocolate (it will have probably formed a ball) and mix well. Scrape bottom and sides of bowl with a spatula.
  5. Sift together flour, baking powder and salt, then add to the chocolate mixture. Mix lightly until colour is even. Scrape bottom and sides of bowl again.
  6. Add sour cream and mix until just combined.
  7. Turn out into prepared tin and spread out evenly with a spatula or knife. Bake for 30 minutes or until a skewer inserted into the centre comes out clean.
  8. Cool completely in tin before turning out, removing the edges with a big, sharp cook’s knife and slicing into squares. Dust with icing sugar if desired.
Makes 10–12.


Tips
  • When melting chocolate in a bowl over simmering water, be careful not to burn yourself on steam escaping from between the bowl and the saucepan - especially when you're stirring the chocolate. You can actually buy double-boilers to use for this exact kind of thing, but I haven't bothered yet.
  • The very top of the brownies will probably wrinkle or pucker during cooking because the brownies rise then deflate. If it worries you, leave the brownies upside down for a while before cutting them- it could “squash out” the wrinkles; honestly, I don’t bother.
  • Ensure the brownies are completely cold before slicing, or they will end up with sloppy, rough-looking edges.
  • I think these are best eaten within 24 hours of slicing.

Sunday 26 June 2011

Lemon delicious


To continue the theme of my last post, I’ve found another pudding that’s not common, but is definitely a crowd-pleaser. While it belongs to an earlier generation than mine, I’ve noticed lemon delicious is making its way back into the cookbooks recently. It’s one of those Australian recipes handed down through families over the years, so I’d say there’s quite a few version of it out there. A few weeks ago, I sat through an in-depth discussion between my grandma-in-law and an aunt-in-law as they debated whether or not you should strain the pulp from the lemon juice (I’d love to give you a run-down of both sides of that argument, but I was too busy stuffing my face to pay close attention).

If you have no idea what lemon delicious is, imagine a light lemon sponge floating over a creamy lemon sauce, and pure heaven where the two meet.

Now, the word on the street (okay, in the recipe books) is that it’s necessary to bake lemon delicious in a water bath. “What’s that?” you wonder. A water bath is a basin (usually a large, deep roasting pan), filled with water, into which you place the pudding dish. The purpose is to prevent the mixture curdling during cooking.

Due to the fact that every single lemon delicious recipe I’ve seen requires this water bath, I have included the step in my recipe here; however, I have made lemon delicious sans water bath before, and there were no dire side effects. Perhaps I was just lucky.

Place the dish in a water bath

Lemon delicious can be served warm or cold. I don't like to hoe into lemon delicious fresh from the oven, because the sauce is still thin, runny and too hot for my greedy little mouth. I prefer to leave the pudding on the bench for an hour or so and serve lukewarm, or pop it into the fridge and serve cold later on. The sauce will thicken up nicely as the pudding cools. This makes lemon delicous a fantastic dessert to prepare the day before you need it, and keep in the fridge overnight.

Fresh from the oven, the sauce is quite thin
The sauce will thicken as the pudding cools

Ingredients
70 g unsalted butter, softened
200 g caster sugar
Zest of 1 lemon
3 eggs, separated
90 g self-raising flour
400 ml milk
80 ml lemon juice

Method
  1. Preheat oven to 160°C and grease a 2.5 litre baking or casserole dish.
  2. Beat butter, sugar and lemon rind with an electric mixer until very well combined.
  3. Add egg yolks, one at a time, beating well after each.
  4. Add flour, lemon juice a milk, and beat on low speed until combined.
  5. In a separate bowl, beat egg whites until the form soft peaks. Fold the egg whites into the mixture.
  6. Pour mixture into prepared dish, place in water bath and bake uncovered 50 minutes.
  7. Leave to cool or refrigerate before serving. Dust with icing sugar and serve with cream.
Serves 6.


Beat egg whites to soft peaks

Tips
  • If you’d like to use fresh lemon juice, I suggest you use more than 80 ml. I find that bottled lemon juice has a more concentrated flavour than lemons I squeeze myself (perhaps I should try straining).
  • Put a twist on this dish by using lime instead of lemon. Remember that lime has a stronger, sharper flavour than lemon, so you won’t need to use as much zest and juice.